
Organizing your media
The Gallery holds every image and video you generate or upload. It is organized into boards. Every board belongs either to a project — each has an Inbox for new results, plus any boards you add to it — or to the Library, whose boards are available from every project and include the always-present Uncategorized board. From the Gallery you choose where new results go, find media by its prompt or by what it shows, and move, star, download or delete it.
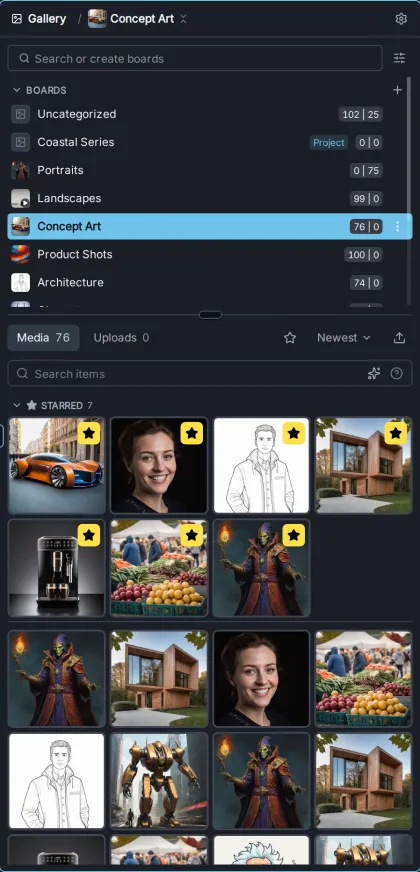
The Gallery at a glance
Section titled “The Gallery at a glance”The Gallery has three parts:
-
The header shows the selected board after Gallery /. Click the board name to hide or show the board list. The gear button opens the Gallery settings.
-
The board list has a search field (Search or create boards), a Filter & sort boards button, and the boards themselves, grouped under the open project’s name, Library and, when turned on, Other projects, By Date and Archived. Each group can be collapsed; the project group shows how many boards it has, its Inbox included, the Library how many it has besides Uncategorized, and Other projects how many projects it lists.
-
The media area shows the contents of the selected board, on two tabs:
- Media — images and videos generated in InvokeAI.
- Uploads — images, videos and audio you have uploaded.
Above the grid are the Search items field, the Starred only filter, the sort order (Newest or Oldest) and the upload button.
When the Gallery is narrow, or docked in a side rail, the board list sits above the media grid. When it is wide, the board list becomes a column on the left. Drag the divider between them to resize the list.
Each board shows its cover image, its name and a count such as 76 | 12: 76 items on the Media tab and 12 on the Uploads tab. A project’s Inbox is pinned at the top of its group with an inbox icon. On a multi-user installation, other people’s boards show their owner’s name.
Boards
Section titled “Boards”Creating a board
Section titled “Creating a board”Type a name into Search or create boards. If no board has that name, a Create board ”…” in … row appears in both the open project’s group and the Library group; click the one where the board should live, or press Enter to create it in the project. Each of those two groups also has a + button, which asks for the board’s name and creates it in that group; anything already typed in the search field is filled in for you.
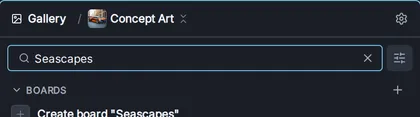
The new board is selected straight away, so it also becomes the destination for new results. A board’s cover is chosen automatically: its newest starred item, or its newest item if nothing is starred.
Choosing where new media goes
Section titled “Choosing where new media goes”By default, new results go to the board that is selected in the Gallery: select a board, press Invoke, and the results land on that board. The destination is fixed when you press Invoke, so you can select another board and queue more work while earlier jobs are still running, without redirecting them.
- A new project starts with its Inbox selected. See Projects.
- If you select a date board (see below), results go to the project’s Inbox, because date boards are only a view.
- Uploads go to the selected board.
- If you archive or delete the selected board, the selection, and with it the destination, moves to Uncategorized.
To keep sending results to one board while you browse others, make it the auto-add board: choose Auto-add to this board from its menu. The board is marked Auto, and new generations, Canvas saves, pasted media and the results of workflow nodes whose Board is set to Auto all go there, whichever board you are viewing. Choose Stop auto-adding here from the same menu to go back to following the selected board. The setting behind this is Send new results to the selected board, in the Gallery settings.
Finding, filtering and sorting boards
Section titled “Finding, filtering and sorting boards”Typing in Search or create boards narrows the list to boards whose names contain the text. Selecting a board clears the search.
The Filter & sort boards button beside the search field controls which boards are listed and in what order:
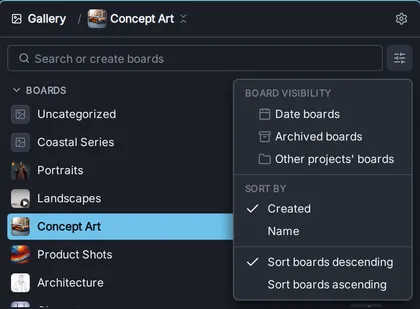
- Board visibility
- Date boards — adds a By Date group with one board per day on which you created media. Date boards are read-only views: you cannot upload to them, drop media on them, or rename or delete them.
- Archived boards — adds an Archived group listing the boards you have archived.
- Other projects’ boards — adds an Other projects group with your other projects’ boards, grouped by project. They are hidden by default to keep the list focused; the open project’s boards are always shown.
- Sort by — Created (the default) or Name, in descending or ascending order. Each project’s Inbox and the Library’s Uncategorized always stay at the top of their group.
These choices are saved with the project, so each project can list boards differently.
Renaming, archiving, downloading and deleting boards
Section titled “Renaming, archiving, downloading and deleting boards”Right-click a board, or hover over it and click its ⋯ button, to rename, move, archive, download or delete it. Managing boards in the Gallery Reference describes each action, including what deleting a board does to its media.
Finding media in a board
Section titled “Finding media in a board”Search, the starred filter and the sort order apply to the selected board and the current tab (Media or Uploads).
Searching by metadata
Section titled “Searching by metadata”Type into Search items to find media whose generation metadata contains the text, such as a word from the prompt, a model name or a seed. The search is not case-sensitive and matches the text exactly as typed, spaces included. Media without metadata, such as most uploads, can only be found by date.
To limit results by date, add a date token. The ? button in the search field shows the syntax:
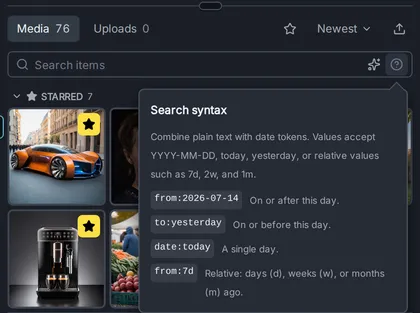
from:— on or after a day, e.g.from:2026-07-14to:— on or before a day, e.g.to:yesterdaydate:— a single day, e.g.date:today
Days can be written as YYYY-MM-DD, today, yesterday, or relative to today: 7d, 2w and 1m mean 7 days, 2 weeks and 1 month ago. For example, lighthouse from:2w finds media from the last two weeks whose metadata mentions a lighthouse. A token that cannot be read is shown in red.
Searching by content
Section titled “Searching by content”When image indexing is turned on, the Gallery can also search by what media shows, whatever the prompt said: find “sunset on the beach” even in images that were never prompted with those words. This semantic search uses the same index as the Image Map. To turn indexing on, install the DFN2B-CLIP-ViT-L-14-39B model from the starter models and restart the backend; see Activating the Image Map. When indexing is turned off, the semantic search button is not shown.
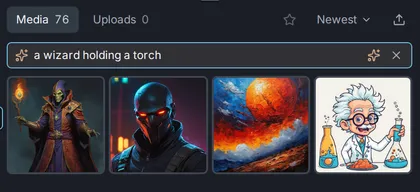
- Search by text. Click the sparkle button at the right end of the search field (Search semantically). The field changes to Describe what to find…; describe what you are looking for. Any text already in the field is used straight away.
- Search by image. Drag an image onto the search field: a thumbnail from the Gallery, an image from the Preview, an image file from your computer, or an image from another browser tab. The Gallery then shows the media most similar to it, labelled Similar to ….
Results are ranked by similarity, most similar first, up to 500 items from the selected board. Videos are included. The Media and Uploads tabs, the sort order, the starred filter and date tokens do not apply to ranked results.
To leave semantic search, click the ✕ in the search field, click the sparkle button again (Exit semantic search), or switch tabs. If the index model is not installed, the Gallery says so when you try to search. Archived boards are not indexed.
Sorting and the starred filter
Section titled “Sorting and the starred filter”The sort menu orders media by creation time, Newest first (the default) or Oldest first. The star button next to it (Starred only) shows only starred items. Images and videos are always shown together.
Browsing large boards
Section titled “Browsing large boards”The media grid continues through the full listing as you scroll, including older items beyond the first few screens. You can also drag the scrollbar to jump to a distant part of the list; the Gallery loads items near that position without first loading every item in between. Scroll back up to browse earlier positions.
While a part of the list loads, its tile positions stay in place. If one page cannot be loaded, the Gallery marks its first empty tile with an error and Retry, while keeping nearby loaded items available.
Starring favorites
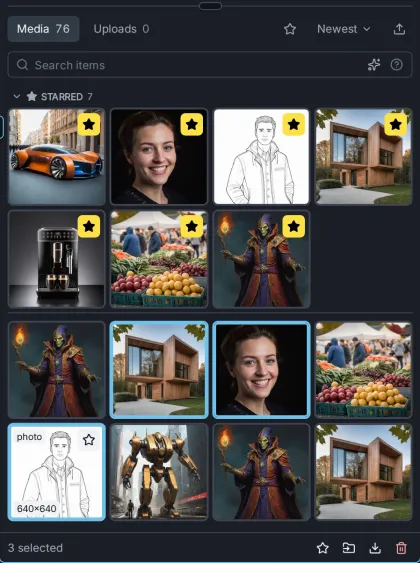
Section titled “Starring favorites”Star an item to keep it at hand. Hover over a thumbnail and click the star in its corner, choose Star image (or Star video) from its menu, or select items and press . (period). Starred thumbnails keep a yellow star.
Starred items are gathered in a Starred section at the top of the board, above the rest of the media, which can be collapsed. If there are more than fit, Show all switches on the Starred only filter. Starring also affects the board’s cover, which is its newest starred item.
Uploading media
Section titled “Uploading media”Click the upload button at the right of the tab bar (Upload media to …) and choose files, or drag files from your computer onto the media grid. An empty board also shows Drop media here or click to upload. Uploads go to the selected board, on its Uploads tab. You cannot upload to a date board.
You can upload:
- Images — PNG, JPEG and WebP.
- Videos — stored and played as H.264/AAC MP4. H.264 video in another container, such as an iPhone
.movrecorded as “Most Compatible”, is repackaged almost instantly. Other formats, such as HEVC, ProRes, VP9 and.wmv, are converted, which takes roughly as long as the clip on a typical CPU. 10-bit HDR footage is converted to 8-bit without tone mapping, so it will look flatter than the original. - Audio — MP3, M4A, WAV, FLAC, OGG and similar files become a video that shows the waveform. It behaves like any other video, for example as the soundtrack for audio-to-video generation.
You can also paste an image or video from the clipboard while no text field has focus. A dialog asks whether to upload it to the Gallery, add it to the Canvas, or use it as a reference image.
Selecting, moving and deleting media
Section titled “Selecting, moving and deleting media”Click an item to select it, and double-click it (or press Enter while its thumbnail has keyboard focus) to open it in the Preview, in the center of the workbench. Shift-click selects a range, and Ctrl-click (Cmd-click on macOS) adds or removes single items. Ctrl+A selects everything loaded on the page, and Escape clears the selection.
While anything is selected, a bar at the bottom of the Gallery shows how many items are selected, with buttons to star them, move them to another board, download them, or delete them.
Moving media to another board
Section titled “Moving media to another board”Drag items onto a board in the board list; if the list is hidden, it opens while you drag. You can also use Change Board in an item’s menu, or the move button in the selection bar. Moving never copies: each item is on one board at a time. Remove from Board in the Change Board menu moves an item to Uncategorized.
Deleting media
Section titled “Deleting media”Press Delete (or Backspace), choose Delete Image, Delete Video or Delete Selection from the menu, or use the delete button in the selection bar. Deleting permanently removes the items from every board and from disk, and cannot be undone. A confirmation asks first. Tick Don’t ask me again and confirm to stop asking (cancelling leaves it on); you can turn it back on, or off, with Confirm image deletion in Settings under Gallery.
Deleting does not check whether an image is still used elsewhere, for example on a canvas or as a reference image, so check before you delete media you are still working with. If deleting is interrupted, InvokeAI cleans up any leftover files the next time it starts.
Related pages
Section titled “Related pages”- Gallery Reference — the board and media menus, Gallery settings and keyboard shortcuts.
- Image Map — explore your whole gallery as a map of similar images.
- Image Storage Maintenance — for administrators: reorganize how image files are stored on disk.
- Intermediates — reclaim space used by temporary files that never reached the Gallery.