Layers panel guide
Esta página aún no está disponible en tu idioma.
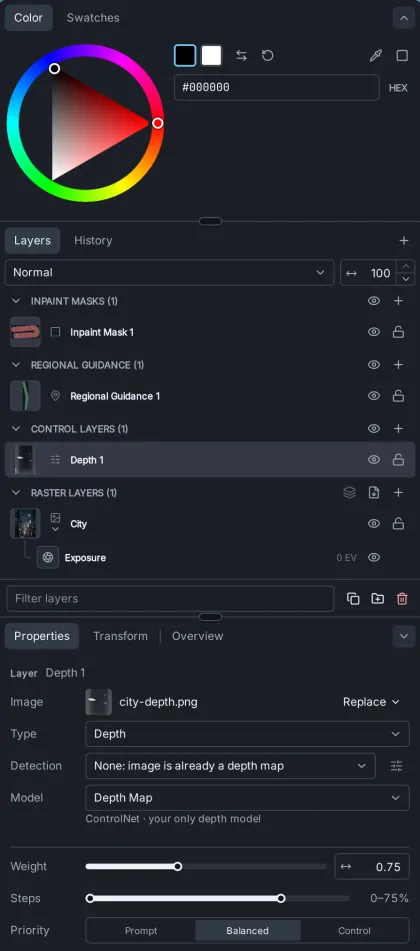
The Layers panel sits to the right of the Canvas in the Edit layout. It has three parts, from top to bottom:
- Color — the color picker and swatches used by the painting tools.
- Layers and History — the canvas’s layers, or its undo history.
- Properties, Transform and Overview — the settings of the active tool and of the selected layer.
Drag the dividers between the parts to resize them, and use the chevron at the right of the Color and Properties tabs to collapse them. The sizes are saved with the project.
For an introduction to the layer types, see Crafting images with the Canvas.
The Color tab edits the two painting colors: the Foreground color, which the brush and text use, and the Background color. Click a chip to choose which one you are editing.
- The color wheel, or a box picker via Switch to box picker, and the hex value, always shown. The format button next to it cycles through hex only, RGB, HSB and HSL, adding a field for each channel.
- Swap foreground and background colors (X) and Reset colors to black and white (D).
- Pick a color from the canvas — the eyedropper. You can also hold Alt on the canvas with the Brush, Eraser, Gradient, Text or View tool. A magnifying loupe shows the pixel under the pointer and its RGB values; see the Canvas guide.
- When an inpaint mask or regional guidance layer is selected, a third chip, Mask tint, edits the color of its overlay.
Picking with Alt on the canvas writes to what you are editing: the mask tint while Mask tint is chosen, the selected shape layer’s fill (foreground chip) or stroke (background chip), the selected text layer’s color, and otherwise the active foreground or background color. A pick never turns on a fill or stroke the shape does not have: on such a shape it sets the active foreground or background color instead. A pick that changes a layer is one undoable step. The eyedropper button sets the mask tint while Mask tint is chosen, and otherwise the active foreground or background color.
The canvas’s tool keys, such as B for the Brush, and [, ], X and D, also work while the Layers panel or the Color tab has focus, except while you type in a field.
The Swatches tab has built-in Swatches, your Recent colors, and the Project palette: click + (Add current color to palette) to save a color with the project, and right-click a swatch to remove it.
Layers
Section titled “Layers”The layer list
Section titled “The layer list”Layers are grouped into four stacks: Inpaint Masks, Regional Guidance, Control Layers and Raster Layers. Within a stack, higher layers are drawn over lower ones. Click a stack’s header to collapse it. The buttons at the right of a header end with New layer, which adds a layer of that type. The Inpaint Masks, Regional Guidance and Control Layers headers have Hide all on canvas (or Show all on canvas) just before it, which only gets the stack’s layers out of view: they still affect generation. The Raster Layers header has Merge visible and Export to PSD instead. Collapsed stacks and groups stay as you left them when you switch to another open project and back.
Each row shows, from left to right:
- A colored stripe, if you gave the layer a color label.
- A thumbnail, the layer type and the name.
- On masks, regional guidance and control layers hidden with Hide on canvas only (in the layer menu), a closed-eye button: the layer is off the canvas but still affects generation. Click it to show the layer again.
- An eye button (Show or hide layer). A hidden layer is off the canvas and takes no part in generation.
- A lock button (Toggle lock), which prevents editing. Painting, moving or transforming a locked layer is refused with a notice that says so.
Rows can have child rows, shown with a chevron: adjustments and regenerate regions on raster layers, noise and denoise limits on inpaint masks, and reference images on regional guidance layers. A child row shows its icon (or the reference image), its name, its value where it has one, and its own eye button (Enable/disable), which turns it off without removing it. While its layer is hidden, a child row’s eye is dimmed and the child has no effect. Select a child row to edit it in Properties. Thin lines run from each expanded layer or group down to its child rows and the layers inside it, so you can see what belongs where.
The eye buttons of layers and child rows line up in one column at the right edge of the list, with the lock buttons in a column beside them, however deeply a layer is nested in groups.
Drag an adjustment to reorder it, or drop it on another raster layer or group, or among that layer’s adjustments, to move it there as one undoable step. Reference images move between regional guidance layers the same way. A child row’s right-click menu also has a Move to layer submenu listing the layers that can take it.
Working with layers
Section titled “Working with layers”- Add a layer with the + button next to the Layers and History tabs, or by right-clicking empty space in the list. The new layer is placed above the selected one and selected.
- Select a layer by clicking it. Ctrl-click adds or removes layers from the selection, and Shift-click selects a range.
- Rename a layer by double-clicking its name or pressing F2. Enter saves and Escape cancels.
- Reorder layers by dragging them, or with Alt+↑ and Alt+↓. Layers can only move within their own stack.
- Blend mode and Opacity, in the row above the list, apply to the selected layer. There are 16 blend modes, from Normal and Multiply to Color and Luminosity.
- Group layers into folders with Group selected layers, or Ctrl+G on the canvas. Alt+→ moves a layer into the group above it and Alt+← moves it out. A group’s eye and lock, and its Hide group on canvas only, apply to everything in it.
- Filter layers at the bottom of the list shows only the layers whose names match.
- The buttons beside the filter Duplicate selected layers, Group selected layers and Delete selected layers.
History
Section titled “History”The History tab lists the canvas’s edits, oldest first, with the current step highlighted and undone steps in italics. The first row, Start, is the canvas before the oldest kept step. Click a step to go back or forward to it, or use the Undo and Redo buttons (Ctrl+Z, and Ctrl+Shift+Z or Ctrl+Y). While a Filter or Select Object operation runs, the steps wait until it ends. Clear history discards the undo steps after you confirm; the canvas itself does not change.
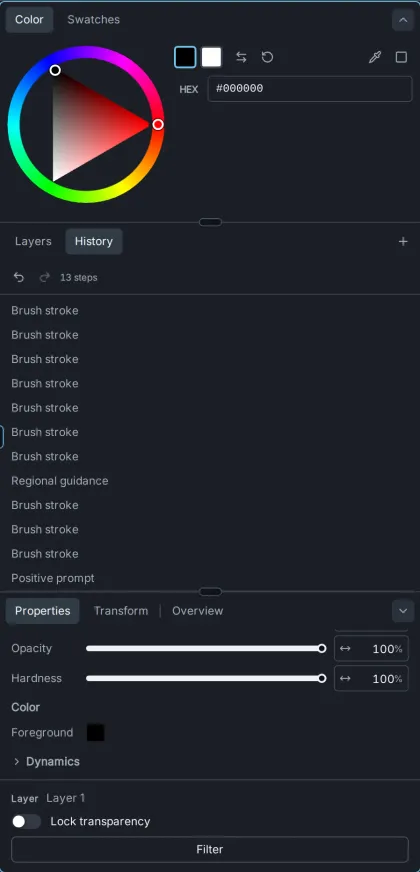
The history keeps the last 64 steps; when older ones are dropped, the Start row says how many. It lasts only while the project is open in your browser: reloading the page or clearing the canvas clears it, and so does leaving a project’s canvas closed for a while, which the Start row then notes.
Below the steps, Restore points list the canvases a Clear canvas replaced and the results a Discard all dropped, newest first, with what each brings back. Restore puts a cleared canvas back (its staged results too) and keeps the canvas it replaces as a restore point, with Undo; a discarded-results point puts its results back for review. A project keeps its five newest restore points of each kind, saved with it. Restoring a canvas saves strokes still uploading first, and waits while results are staged or a canvas generation runs, since restoring would throw those results away; the notice says so. Discarded results can be brought back at any time.
The layer menu
Section titled “The layer menu”Right-click a layer, or select it and press Shift+F10, for its menu. Right-clicking the canvas opens the same menu for the selected layer.
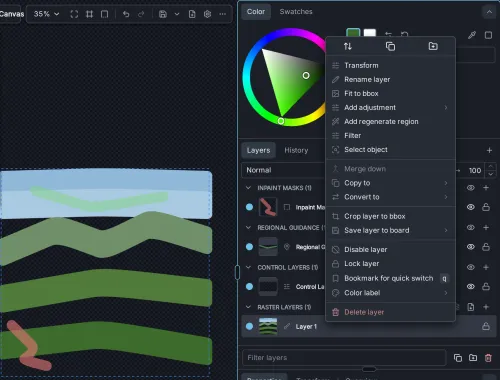
The icons at the top Arrange the layer (move it to the front, forward, backward or to the back), Duplicate layer and Group layers. Below them:
- For every layer:
- Rename layer and Fit to frame (scale the layer to fit inside the generation frame).
- Merge down — combines the layer with the one below. Each layer’s adjustments are baked into the merged pixels; undo restores both layers with their adjustments.
- Copy to — including Copy layer to clipboard, and copies to other layer types.
- Crop layer to frame — keeps only the part of the layer inside the generation frame. It refuses, saying why, a layer that is locked or inside a locked group, a layer that lies entirely outside the frame (cropping would leave it empty), and a layer whose image could not be read, for example because it was deleted from the Gallery. A cropped control layer keeps its Type, but its cropped map becomes its image: the original it was detected from is no longer kept, and Detection changes to None.
- Save layer to board — saves the layer to the Gallery as an upload, in Uncategorized or a board you pick from its submenu.
- Hide layer, Lock layer, Bookmark for quick switch and Color label. A bookmarked layer is where Q switches on the canvas; press Q again to return. The bookmark is not saved in the project: it lasts while the project is open in your browser and resets on reload.
- Remove from group — for a layer inside a group: moves it out, directly above the group. With several layers selected, it appears when they are all in the same group, and moves them together in their current order. The emptied group stays.
- Delete layer.
- Raster layers:
- Transform (Shift+T) — shows the transform handles at once. It works on enabled raster and control layers with content.
- Add adjustment — Brightness/Contrast, Exposure, Levels, Curves, Saturation, Hue, Invert, Texture, Clarity, Dehaze or Noise. Adjustments are non-destructive and appear as child rows. Texture, Clarity and Dehaze change detail and contrast; Noise adds film grain.
- Add regenerate region — regenerates where the layer has content, as a live inpaint mask: everything on the layer marks the area to regenerate, and it follows the layer as you keep editing it. The menu shows this description under the item.
- Filter, Select object and Run workflow — process the layer; see the Canvas guide.
- Use as control layer — copies the layer’s pixels to a new control layer, whose Properties then ask for its Type.
- Boolean operations — combine the layer with the one below: intersect, cut out, cut away or exclude.
- Convert to — make it a control layer, inpaint mask or regional guidance layer. Text, shape and gradient layers can also be rasterized into plain pixels. Control layers have no adjustments, so converting a layer with adjustments to a control layer, or using it as one, bakes them, with the layer’s scaling and rotation, into its pixels; undo restores the raster layer with its adjustments.
- Control layers: Transform, Select object, Run workflow, Enable transparent preview, Convert to raster layer, and Hide on canvas only. A control layer’s map comes from its Detection row in Properties, so it has no Filter.
- Inpaint masks: Add noise, Add denoise limit, Extract masked area (copy the masked part of the image to a new layer), and Hide on canvas only.
- Regional guidance: Enable auto-negative, Add reference image, and Hide on canvas only.
When several layers are selected, the menu also offers Merge selected layers. When only inpaint masks are selected, it offers Merge masks instead: the masks are combined into one new inpaint mask, named after the topmost one with “merged” added. It covers everywhere any of the masks did, at full strength whatever each mask’s opacity, and takes the topmost mask’s fill color and style. The new mask is placed where the topmost one was, even when the masks are in different groups, and replaces them. Merge masks needs two or more enabled, unlocked inpaint masks with content, whose noise and denoise limit settings match, since the new mask applies one setting to all of its area. When the item is unavailable, highlighting it shows why. One undo brings the original masks back.
Properties
Section titled “Properties”A heading at the top of the Properties tab names what it is editing: Layer: or Group: followed by the selected layer’s or group’s name, Operation: followed by the operation’s name while a Filter or Select Object operation runs, or No layer selected. It stays in view as you scroll, so you can always tell which layer the settings below belong to.
Below the heading, the tab shows up to three sections, in this order:
- The running operation’s settings — while a Filter or Select Object operation is running. Starting either from a layer’s menu opens the Layers panel on this tab.
- Tool — the options of the active canvas tool; see the Canvas guide.
- Layer — the settings of the selected layer.
The Layer section is dimmed while Filter or Select Object is running.
Raster layer
Section titled “Raster layer”- Lock transparency — paint only where the layer already has pixels, leaving transparent areas transparent, like Photoshop’s “Lock transparent pixels”. Use it to recolor a shape without spilling paint around it, or to refine a subject painted on a transparent layer without growing its outline. Brushes, shapes and pen input all respect the lock, and the Eraser and a Shape cutout can’t remove pixels while it’s on.
- Shape appearance — with a shape layer selected, its Fill, Stroke and stroke Width appear under Appearance, whatever canvas tool is active. Each gesture is one undoable step and changes only the selected shape. The Shape tool’s own Appearance group sets creation defaults separately.
- Filter — start the Filter operation.
The Brush and Eraser paint directly on a selected image layer, such as an accepted result or an added picture, rather than adding a new layer. The first stroke turns it into a paint layer, with its position, scale and adjustments applied to its pixels; one undo restores the original image layer.
Adjustment child rows each have their own settings, such as Brightness and Contrast, Exposure, Levels and Curves with a channel selector, Saturation, and Hue. A regenerate region has a Fill color and Fill style.
Noise adds film grain with these settings:
- Distribution — Gaussian for natural, film-like grain, or Uniform for an even spread. Both have the same strength at the same amount; larger grain sizes look gaussian either way.
- Grain — Mono changes brightness only; Color varies each color channel separately; Chroma varies only hue and colorfulness and leaves brightness alone, like the color speckle of a digital sensor.
- Tonal response — Midtones (the default) gives full grain in the midtones and fades it to none in pure black and white, as film does; Even gives the same grain at every tone.
- Size — how large each grain is, from 1 px (every pixel varies on its own, the default) to 8 px. Larger grain is softer and clumpier but keeps the same strength.
- Amount — the grain’s strength. 2–5% gives subtle grain, about 10% (the default) clearly visible grain, and high values very heavy noise.
- New pattern (dice button) — picks a different random grain pattern.
Things to know about Noise:
- The pattern stays put. Each Noise adjustment keeps its grain pattern until you pick a new one, and reloading the project keeps it. Duplicating a Noise adjustment gives the copy a new pattern.
- The grain you see is the grain you get. Generating, exporting, merging and saving to PSD all use the same pattern and strength. One exception: PSD has no group adjustments, so a group’s Noise is baked onto each of its layers separately, and where semi-transparent layers in the group overlap, the PSD can look slightly different.
- Grain follows its layer. It moves, scales and rotates with the layer; on a group, it stays fixed to the canvas instead. While you drag a selection, the dragged pixels keep their grain; once placed, they take the layer’s grain at their new position.
- Baking. Rasterizing a text, shape or gradient layer whose Noise adjustment is enabled bakes its whole adjustment stack into the pixels and removes it, so the grain stays where it was. Merge down bakes each layer’s adjustments the same way.
- Older versions of Invoke. Once a project has had a Noise adjustment, it needs a version of Invoke with Noise adjustments, even after you remove the adjustment; older versions refuse to open it.
Texture, Clarity and Dehaze work on detail and contrast across an area rather than pixel by pixel. They match the Clarity, Texture and Contrast Dehaze workflow nodes:
- Texture — fine detail, such as skin, fabric or foliage. Positive amounts bring it out; negative amounts smooth it.
- Clarity — midtone contrast in larger shapes. Positive amounts add punch; negative amounts soften the image.
- Dehaze — broad contrast and color intensity. Positive amounts increase both, which can lift a flat, washed-out image; negative amounts reduce both. It is an aesthetic approximation, not physical haze removal: it does not estimate real haze or recover lost detail, and strong settings can clip tones or colors.
Their settings:
- Amount — from −200 to 200. The default, 0, changes nothing. Double-click the field or press Backspace in it to reset it.
- Size (Texture and Clarity only) — how large the detail is that the adjustment affects: 1 to 100 px for Texture (8 by default) and 4 to 1000 px for Clarity (40 by default). It is measured in the layer’s own pixels, before the layer is scaled, so resizing a layer does not change which detail is affected. On a group, it is measured in canvas pixels.
Things to know about Texture, Clarity and Dehaze:
- They are computed in the background. Each one looks at the whole layer, so the canvas computes it in the background and stays responsive. Meanwhile, the canvas shows the previous result, or the layer without them after you paint on it. A small spinner appears on the layer’s row when the work takes more than a moment.
- Size limit. They cannot run on content larger than 4096 × 4096 px (16.8 megapixels, measured over the area the layer’s visible content spans, in the layer’s own pixels before any scaling; for a group, at document resolution). A warning icon then appears on the layer’s or group’s row, the canvas leaves them out, and anything that uses the layer’s pixels with them — generating, exporting, merging, rasterizing, filtering, converting to or using as a control layer, cropping to the frame (one layer, or all layers when this one reaches past the frame), saving to PSD, painting on an image layer — is refused with a message naming the layer or group. Disable or remove them, or crop the content. The same warning appears when there is not enough canvas memory or the computation fails; hover over it for what to do, or select the adjustment to read it in Properties.
- What you see is what you get. Generating, exporting, merging, rasterizing and saving to PSD use the same result as the canvas, computing it first if the canvas is still working on it. One exception: PSD has no group adjustments, so a group’s Texture, Clarity and Dehaze are applied to each of its layers separately, and the PSD can look different from the canvas.
- While you drag a selection, the dragged pixels show without them; once placed, the layer is computed again with them.
- Thumbnails of layers the canvas has not shown yet can leave them out.
- Baking. Rasterizing a text, shape or gradient layer with one of them enabled bakes its whole adjustment stack into the pixels and removes it. Merge down bakes each layer’s adjustments the same way.
- Older versions of Invoke. Like Noise, once a project has had one of these adjustments, older versions of Invoke refuse to open it, even after you remove the adjustment.
Control layer
Section titled “Control layer”A control layer’s Layer section always has the same rows, in this order: Image, Type, Detection and Model, then Weight, Steps and Priority. The rows stay in place; only their values change.
- Image — the picture the guide comes from. On an empty layer, the row has three buttons: Upload an image from your computer, use the Frame (what is visible inside the generation frame), or Draw the control image yourself on the layer. You can also drop an image file from your computer onto the canvas while the empty layer is selected: the canvas shows Drop an image here over the layer, and the file is uploaded into it. Once the layer has an image, the row shows its thumbnail and a label, such as the file name, and Replace offers the same three choices. The layer keeps this original image beside the detected map, so detection can run again on it.
- Type — what the layer controls: Pose, Depth, Edges, Soft edges, Line art, Sketch, Color or Tile. In the menu, each type shows how many installed models are made for it, via Union when only a Union model covers it, or Not installed. Changing the type sets Model back to automatic, and on a layer with an image it runs the new type’s default detector unless the current one also belongs to the new type.
- Detection — the detector that turns the image into the type’s map, for example Depth Anything or a normal map for Depth, Canny or MLSD for Edges, and DW Openpose or Mediapipe Face for Pose. The None option, such as None: image is already a depth map, uses the image as it is. Until the layer has an image, the row reads Chosen when an image is added and its detectors cannot be chosen; the first image gets the type’s default detector. Sketch, and an image you draw yourself, use None; a drawn image counts once it has a stroke. Tile has no detector and uses the image directly.
- The Detector settings button next to it opens the detector’s options. Changing the detector or its settings runs detection again in the background. A spinner shows while it is waiting, with Waiting to run and the detector’s name, and while it runs, with Running and the detector’s name.
- If detection fails, a Run again button appears; hover over it for the reason. If the map is out of date, a Detect again button appears.
- Model — chosen for you, in this order: the model you picked for this layer; the model you last picked for this type on the same main model family; the only installed model made for the type; a Union model that covers the type. When several models fit equally, the row asks you to choose one. The line under the row says which case applies, for example ControlNet · your only depth model. The menu groups the models under Made for the type, Union and Purpose not set; a layer without a type lists every installed control model for the model family under Installed models. Picking a model made for the type, or a Union model that covers it, remembers it for every layer of that type and model family, in every project; a Purpose not set model, or one made for another type, is used for this layer only. Reset drops this layer’s own pick, so the remembered model, if any, or the automatic choice takes over; when the remembered model is the one in use, Reset forgets it and the layer returns to automatic. If no model fits, the line says so. For Anima, the list holds the ControlNet-LLLite control adapters but not the Inpainting adapter, which is chosen as the Inpaint Adapter in the Generate panel’s Components section instead, and each LLLite model can drive only one control layer per generation.
- Weight — how strongly the guide is followed. The slider runs from 0 to 2; for ControlNet, T2I Adapter and Control LoRA, the number field also accepts values down to −1. The default is 0.75 for ControlNet.
- Steps — the part of the generation, from start to finish, in which the guide applies.
- Priority — Prompt, Balanced or Control: whether the generation leans toward the prompt or toward the guide. It applies to SD 1.5 and SDXL ControlNet models only. A layer saved with the earlier Unbalanced mode shows it as a fourth, selected option until you choose another; new layers do not offer it.
The layer’s row in the list reads Type · Detector · weight, for example Depth · Depth Anything · 0.75, or No image or Choose a type while the layer is incomplete. A spinner shows on the row while its detector is waiting or running, and a warning icon when the layer needs attention; hover over the icon for the reason.
Once a map has been detected, a switch above the canvas shows the layer as its Original image, the detected Map, or an Overlay of the two. It changes only the view. Enable transparent preview, in the layer menu, shows the layer semi-transparently over the image.
A control layer with no image, or with neither a type nor a model, only shows a warning: Invoke stays available and the layer contributes nothing. A layer with an image blocks Invoke when no model can be chosen for it or when its map is out of date. Invoke then shows the number of issues; click it to list them, and choose Show layer to select the layer that needs attention.
A control layer made in an earlier version of Invoke keeps its model and works without a type; its row reads its adapter and weight. Choosing a Type for it sets its model back to automatic and can run the type’s default detector on its pixels.
Inpaint mask
Section titled “Inpaint mask”- Fill color and Fill style (Solid, Grid, Crosshatch, Diagonal, Horizontal or Vertical) — how the mask is drawn on screen.
- Invert mask — swap the masked and unmasked areas.
Its child rows, added from the layer menu, set Noise (noise added inside the mask before generating, 25% by default) and Denoise limit (the most the masked area may change, 80% by default).
Regional guidance
Section titled “Regional guidance”- Positive prompt and Negative prompt — the prompts for this region. Each is saved when you click away from the field. The negative prompt is shown only for models that use one.
- Auto-Negative — also uses the region’s positive prompt as a negative prompt outside the region.
- Fill color, Fill style and Invert mask, as for inpaint masks.
If the selected model does not support regional guidance, a message says that the layer is skipped during generation.
Regional reference image
Section titled “Regional reference image”A regional guidance layer’s reference image is a child row. Select it to set:
- The image: Choose image from the Gallery, drop a gallery image on it, or Upload a file.
- Model — an IP-Adapter (SD 1.5, SDXL) or FLUX Redux (FLUX.1) model.
- For IP-Adapter, Method (Full, Style, Composition, Style (strong) or Style (precise)) and Weight. For FLUX Redux, Image influence.
Transform and Overview
Section titled “Transform and Overview”The Transform tab sets the selected layer’s Position, Scale and Rotation as numbers. Each change is a separate undoable step.
The Overview tab shows a thumbnail of the whole canvas with the visible area outlined. Click it to move the view.
Keyboard shortcuts
Section titled “Keyboard shortcuts”In the layer list:
| Shortcut | Action |
|---|---|
| ↑ / ↓, Home / End | Move between layers |
| → / ← | Expand / collapse, or go to the parent group |
| Enter or Space | Select |
| F2 | Rename |
| Delete / Backspace | Delete the layer |
| Ctrl+C | Copy the layer to the clipboard |
| Alt+↑ / Alt+↓ | Move the layer up / down |
| Alt+→ / Alt+← | Move into the group above / out of its group |
| Shift+F10 | Open the layer menu |
| Ctrl+Z / Ctrl+Shift+Z | Undo / redo |
On macOS, use Cmd in place of Ctrl. More layer shortcuts, such as duplicate, merge and arrange, work while the canvas has focus; see the Canvas guide.